
Emerson 80 Series Thermostat Manual: A Comprehensive Guide
This manual provides detailed instructions for Emerson 80 Series thermostats, covering installation, operation, programming, and troubleshooting for optimal HVAC control.
The Emerson 80 Series represents a line of reliable and user-friendly thermostats designed for both residential and light commercial applications. These thermostats, including models like the 1F86-344, offer precise temperature control for single-stage heating and cooling systems, as well as heat pump configurations.
Known for their simplicity and ease of installation, the 80 Series caters to users seeking a straightforward solution for managing their indoor climate. They are available in both battery-powered and hardwired options, providing flexibility to suit various installation scenarios. This manual will guide you through every aspect of utilizing your Emerson 80 Series thermostat, ensuring efficient and comfortable operation.
Understanding the 80 Series Thermostat Models
The Emerson 80 Series encompasses several models tailored to different HVAC system needs. Key distinctions lie in programmability and system compatibility. The 1F83C-11PR is a programmable option, allowing customized schedules for energy savings and comfort. Conversely, the 1F83C-11NP is a non-programmable model, offering simple, manual control.
Furthermore, models are designed for either conventional heating/cooling systems or heat pump systems. The 1F86-344 is a standard single-stage digital thermostat. Understanding your specific model number – found on the thermostat itself – is crucial for accurate installation and operation, as wiring and settings will vary accordingly. Refer to the model-specific diagrams within this manual.
Key Features of the Emerson 80 Series
Emerson 80 Series thermostats boast user-friendly features designed for comfort and efficiency. These include a clear, easy-to-read display presenting current and set temperatures. Single-stage control provides basic heating and cooling management, while programmable models offer customized scheduling.
Battery power or hardwired operation with a common wire provides installation flexibility. Many models feature a simple mode switch (Heat, Cool, Off) and fan control (Auto, On). Some units include a filter change reminder, promoting system maintenance. The thermostats are compatible with various systems, including conventional and heat pump configurations, offering broad applicability.

Installation Procedures
Proper installation ensures optimal performance. This section details preparing for installation, wiring diagrams for single and heat pump systems, and battery/power options.
Preparing for Installation
Before beginning, carefully review all safety precautions outlined in this manual. Turn off power to your HVAC system at the breaker to avoid electrical shock. Identify your system type – single stage or heat pump – as wiring differs. Gather necessary tools: screwdriver, wire strippers, and potentially a voltage tester.
Remove the existing thermostat’s cover and carefully label each wire connected to the terminals. Note the wiring configuration for accurate reconnection to the Emerson 80 Series. Consult the wiring diagrams provided in this manual, matching your system’s wiring to the appropriate diagram. Ensure compatibility with your HVAC system before proceeding with installation.
Wiring Diagrams for Single Stage Systems
For single-stage systems, connect the ‘R’ wire (power) to the Rh terminal on the Emerson 80 Series thermostat. The ‘W’ wire (heat) connects to the W terminal. The ‘Y’ wire (cool) connects to the Y terminal. A common wire ‘C’ is often required for consistent power; connect it to the C terminal if present in your system.
If a C wire isn’t available, a C-wire adapter may be necessary. Carefully follow the adapter’s instructions. Double-check all connections against the provided wiring diagram to prevent damage to the thermostat or HVAC system. Ensure wires are securely fastened to the terminals. Incorrect wiring can cause malfunctions.
Wiring Diagrams for Heat Pump Systems
Heat pump wiring for the Emerson 80 Series thermostat differs from single-stage systems. Connect ‘R’ (power) to Rh/Rc, ‘Y’ (compressor) to Y, and ‘W’ (auxiliary/emergency heat) to W. The reversing valve wire, ‘O/B’, connects to either the O or B terminal, depending on your system’s configuration – consult your HVAC documentation.
A common wire ‘C’ is crucial for heat pumps. Verify correct O/B terminal assignment to avoid reversed heating/cooling. Incorrect wiring can damage the compressor. Always disconnect power before wiring. Refer to the detailed diagram in the manual for specific configurations and ensure secure connections.
Battery Installation and Power Options
The Emerson 80 Series thermostat operates on batteries or with a common (C) wire for continuous power. For battery operation, use two AA alkaline batteries, installed in the battery compartment. Ensure correct polarity (+/-) during installation. A low battery indicator will appear on the display when replacement is needed.
Connecting a C-wire provides constant power, eliminating battery changes and often improving system performance. If a C-wire is available, connect it to the ‘C’ terminal on the thermostat base. Refer to the wiring diagrams for proper C-wire integration. Battery power serves as backup when using a C-wire.

Operating Instructions
This section details how to interact with your Emerson 80 Series thermostat, including display understanding, temperature adjustments, mode selection, and fan control options.
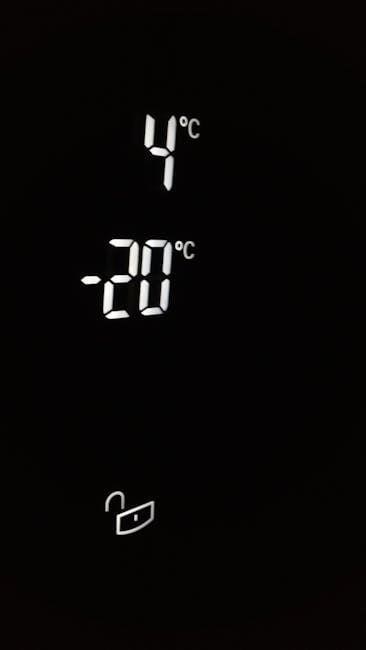
Understanding the Display
The Emerson 80 Series thermostat features a digital display providing crucial information at a glance. Typically, the current room temperature is prominently shown in a large, easy-to-read format. Alongside this, the set temperature – your desired heating or cooling point – is also displayed.
Icons indicate the current operating mode: Heat, Cool, or Off. A fan icon shows whether the fan is set to Auto or On. Some models may include indicators for low batteries or system errors. The display will also show the current time when the thermostat is programmed with a schedule. Familiarizing yourself with these icons and readings is key to effectively managing your home’s comfort using this thermostat.
Setting the Temperature
To adjust the temperature on your Emerson 80 Series thermostat, use the “Up” and “Down” buttons located on the front panel. Each press will typically change the set temperature by one degree Fahrenheit (or Celsius, depending on your settings). The display will show the new set temperature as you adjust it.
Ensure the desired temperature is comfortable for your needs. Remember that it may take some time for the HVAC system to reach the newly set temperature. Avoid making drastic temperature changes, as this can strain your system. Observe the display to confirm the set temperature matches your preference before leaving the thermostat.
Using the Mode Switch (Heat, Cool, Off)
The mode switch on your Emerson 80 Series thermostat controls whether the system operates in heating, cooling, or off mode; Typically, this is a clearly labeled switch or button. Selecting “Heat” activates the heating system when the room temperature falls below the setpoint. “Cool” activates the cooling system when the temperature rises above the setpoint.
The “Off” position disables both heating and cooling, allowing for manual fan control if desired. Ensure the correct mode is selected for the season to optimize comfort and energy efficiency. Verify the switch is firmly set to the desired position for reliable operation.
Fan Control Settings (Auto, On)
The Emerson 80 Series thermostat offers two primary fan control settings: “Auto” and “On”. In “Auto” mode, the fan operates only during heating or cooling cycles, circulating air when the system is actively working to adjust the temperature. This conserves energy and provides consistent temperature control.
Selecting “On” forces the fan to run continuously, regardless of whether heating or cooling is active. This can improve air circulation and even out temperature distribution throughout the space, but it will consume more energy. Choose the setting that best suits your comfort preferences and energy-saving goals.

Programming the Thermostat (If Applicable)
Some Emerson 80 Series models allow scheduling. Users can set time, date, and temperature preferences for customized comfort and energy efficiency.
Setting the Time and Date
Accurate time and date settings are crucial for proper thermostat operation, especially when utilizing programmed schedules. Begin by accessing the thermostat’s settings menu, typically initiated by pressing and holding a designated “Menu” or “Set” button. Navigate through the menu options using the up and down arrow keys until you locate the “Time” and “Date” settings.
To adjust the time, use the arrow keys to increment or decrement the hours and minutes. Confirm your selection by pressing the “Set” or “Enter” button. Repeat this process for setting the correct date, including the month, day, and year. Ensure the AM/PM setting is accurate. Once both the time and date are correctly configured, save the changes by exiting the settings menu.
Creating a Schedule
Programming a schedule allows for automated temperature adjustments, maximizing comfort and energy savings. Access the scheduling function through the thermostat’s menu, often labeled “Program” or “Schedule.” The Emerson 80 Series typically supports multiple periods per day – Wake, Leave, Return, and Sleep – each with a unique temperature setting.
For each period, set the desired start time and temperature. Utilize the arrow keys to navigate and adjust these values, confirming each selection with the “Set” or “Enter” button. You can customize the schedule for each day of the week, or copy settings to multiple days for convenience. Review the complete schedule to ensure accuracy before saving.
Temporary Override Function
The temporary override feature allows for immediate temperature adjustments without altering the programmed schedule. This is useful for short-term comfort needs, like accommodating guests or adjusting for unexpected weather changes. To activate the override, press the “Hold” or “Override” button on your Emerson 80 Series thermostat.
Then, use the arrow keys to set the desired temperature. The thermostat will maintain this temperature until the next scheduled period begins, or until you manually cancel the override. The display will typically indicate “Hold” or “Override” mode to confirm activation. Remember, this is a temporary change and won’t affect your regular schedule.

Troubleshooting Common Issues
This section details solutions for frequent problems like unresponsive displays, inaccurate readings, or HVAC system communication failures with your Emerson 80 Series.
Thermostat Not Turning On
If your Emerson 80 Series thermostat fails to power on, begin by verifying the battery installation. Ensure batteries are fresh and correctly positioned within the compartment, observing proper polarity. For hardwired models, confirm the power supply at the circuit breaker is active and hasn’t tripped.
Inspect the wiring connections at the thermostat and the HVAC system, ensuring they are secure and free from corrosion. A loose wire can interrupt power flow. If the issue persists, check the thermostat’s internal fuse (if equipped) and replace it if blown.
Finally, a completely drained battery, even in hardwired systems, can sometimes prevent operation. Try replacing the batteries even if the unit is wired for power.
Inaccurate Temperature Readings
If your Emerson 80 Series thermostat displays incorrect temperatures, several factors could be at play. First, ensure the thermostat isn’t directly exposed to sunlight, drafts, or heat-generating appliances, as these can skew readings. Check for obstructions blocking airflow around the unit.
The thermostat may require temperature calibration. Refer to the “Temperature Calibration” section of this manual for instructions on adjusting the displayed temperature to match a known accurate thermometer.
Consider the thermostat’s location; internal walls are generally more representative of room temperature. If problems continue, a faulty temperature sensor may necessitate professional service.
Display Issues
If the display on your Emerson 80 Series thermostat is blank, dim, or showing unusual characters, begin by checking the battery level. Replace batteries with fresh ones, ensuring correct polarity. For hardwired models, verify the power supply at the circuit breaker and the thermostat wiring connections.
A flickering display might indicate low voltage or a loose connection. If the display is consistently dim, explore the “Backlight Adjustment” settings within the thermostat’s menu.
Should the issue persist, a faulty display panel may require professional repair or thermostat replacement.
Communication Problems with HVAC System
If your Emerson 80 Series thermostat isn’t properly communicating with your heating or cooling system, first double-check all wiring connections. Ensure wires are securely fastened to the correct terminals, referencing the appropriate wiring diagram for your system type (single-stage or heat pump).
Verify the HVAC system’s power is on and functioning correctly. A tripped breaker or faulty system component can disrupt communication.
If problems continue, a compatibility issue or a malfunctioning relay within the HVAC system might be the cause, requiring professional diagnosis and repair.
Advanced Settings and Features
Explore filter change reminders, temperature calibration options, and backlight adjustments within the Emerson 80 Series for personalized comfort and efficient system maintenance.
Filter Change Reminder
The Emerson 80 Series thermostat incorporates a helpful filter change reminder feature, designed to maintain optimal HVAC system performance and air quality. This function prompts you to replace your air filter at regular intervals, preventing dust and debris buildup.
To activate or adjust the reminder settings, navigate through the thermostat’s advanced menu options. You can typically customize the reminder frequency based on your filter type and usage conditions. Ignoring filter changes can lead to reduced efficiency, increased energy costs, and potential damage to your heating and cooling equipment.
Regular filter replacement ensures clean airflow, prolongs system lifespan, and contributes to a healthier indoor environment. Consult your HVAC system’s documentation for recommended filter replacement schedules.
Temperature Calibration
The Emerson 80 Series thermostat allows for temperature calibration, a useful feature if you suspect the displayed temperature doesn’t accurately reflect the actual room temperature. This adjustment compensates for thermostat placement or external factors influencing readings.
Access the calibration setting through the thermostat’s advanced menu. You can then increase or decrease the displayed temperature in small increments, comparing it to a trusted thermometer. Precise calibration ensures accurate temperature control and comfortable living conditions.
Carefully adjust the calibration; excessive adjustments can negatively impact system performance. Regularly verifying temperature accuracy contributes to energy efficiency and consistent comfort.
Backlight Adjustment
The Emerson 80 Series thermostat features a backlight for enhanced visibility in low-light conditions. Adjusting the backlight settings allows you to customize the display’s brightness to suit your preferences and conserve battery power. Access the backlight adjustment option within the thermostat’s settings menu.
Typically, you can select from several brightness levels, including off, low, and high. A dimmer setting extends battery life, while a brighter setting improves readability. Experiment to find the optimal balance between visibility and energy conservation.
Proper backlight adjustment ensures clear display readings without unnecessary power consumption, contributing to a user-friendly experience.

Technical Specifications
The Emerson 80 Series operates on standard batteries, handles temperatures from 32°F to 90°F, and boasts ±1°F accuracy for reliable climate control.
Power Requirements
The Emerson 80 Series thermostat offers flexible power options to suit various installation scenarios. It can operate effectively using two AA alkaline batteries, providing a reliable power source even during electrical outages, ensuring continued temperature regulation. Alternatively, the thermostat supports hardwired power with a common (C) wire, eliminating the need for battery replacements and offering a consistent power supply.
When utilizing battery power, it’s recommended to use high-quality alkaline batteries for extended life. The thermostat will display a low battery indicator when replacement is needed. For hardwired installations, a 24 VAC power source is required, commonly supplied by the HVAC system’s control board. Always adhere to proper electrical safety precautions during hardwiring.

Temperature Range
The Emerson 80 Series thermostat is designed to operate accurately within a broad temperature spectrum, ensuring comfortable and efficient climate control in diverse environments. The thermostat effectively measures and regulates temperatures ranging from 32°F to 90°F (0°C to 32°C).
However, optimal performance and accuracy are best achieved within the typical indoor comfort range of 60°F to 80°F (15°C to 27°C). Exposure to temperatures outside the specified range may temporarily affect the thermostat’s readings. It’s crucial to avoid installing the thermostat in locations prone to extreme temperatures or direct sunlight, which could compromise its accuracy and reliability.
Accuracy
The Emerson 80 Series thermostat boasts a commendable level of temperature accuracy, crucial for maintaining consistent comfort and energy efficiency. Typically, this thermostat achieves an accuracy of ±1°F (±0.6°C) under normal operating conditions. This means the displayed temperature should closely reflect the actual ambient temperature within this margin of error.
However, several factors can influence accuracy, including thermostat placement, airflow, and exposure to drafts. To ensure optimal precision, avoid locating the thermostat near heat sources, windows, or areas with poor air circulation. Regular calibration, as outlined in the advanced settings, can further refine accuracy.

Safety Precautions
Always disconnect power before wiring. Exercise caution with electrical components. Follow all local codes during installation and ensure proper handling and storage.
Electrical Safety
Prior to any installation or maintenance work on the Emerson 80 Series thermostat, completely disconnect the power supply to your heating and cooling system at the breaker panel. Failure to do so could result in electrical shock or damage to the thermostat and HVAC equipment. Never work with live wires. Ensure all wiring connections are secure and comply with local electrical codes. If you are uncomfortable working with electrical wiring, consult a qualified HVAC technician. Improper wiring can create a fire hazard or damage the system. Always use insulated tools and wear appropriate safety gear. Double-check all connections before restoring power. Remember, electrical safety is paramount.
Handling and Storage
When handling the Emerson 80 Series thermostat, avoid dropping or subjecting it to strong impacts, as this could damage the internal components. Store the thermostat in a clean, dry environment, away from extreme temperatures and humidity. Protect it from dust and direct sunlight. If storing for an extended period, keep it in its original packaging or a protective container. Avoid storing near magnetic fields or sources of interference. Do not disassemble the thermostat, as this will void the warranty. Ensure the thermostat is handled with care to maintain its functionality and appearance. Proper storage extends the lifespan of the device.
Resources and Support
Access the Emerson 80 Series manual (PDF) online, or contact Emerson Support for assistance. Find replacement parts through authorized distributors for continued use.
Downloading the Manual (PDF)
Obtaining a digital copy of the Emerson 80 Series Thermostat Manual in PDF format is straightforward and offers convenient access to all the information you need. Several online resources host the manual for immediate download, ensuring you have the guidance required for installation, operation, and troubleshooting.
The Manual Library is a reliable source, providing access to various Emerson models, including the 80 Series. Simply search for your specific model number – such as 1F83C-11PR or 1F83H-21PR – to locate the corresponding PDF file. Downloading the manual allows you to save it to your device for offline viewing, ensuring you always have it available when working with your thermostat. This digital format is easily searchable, making it simple to find specific instructions or diagrams.
Contacting Emerson Support
For direct assistance with your Emerson 80 Series Thermostat, reaching out to Emerson Support is a valuable option. While specific contact details aren’t explicitly provided in the snippets, exploring the Emerson website is the best starting point. Look for a “Contact Us” or “Support” section, typically found at the bottom of their homepage.
You may find options for phone support, email inquiries, or live chat assistance. Having your thermostat’s model number – like 1F86-344 – readily available will expedite the process. Emerson’s support team can provide clarification on manual instructions, troubleshoot issues, and offer guidance on replacement parts. Remember to clearly describe your problem and any steps you’ve already taken.
Finding Replacement Parts
Locating replacement parts for your Emerson 80 Series Thermostat requires a bit of research. The provided text mentions “Finding Replacement Parts” as a resource, suggesting Emerson’s official website is the primary source. Online retailers specializing in HVAC components are also viable options. Knowing the precise model number – such as 1F83C-11PR or 1F86-344 – is crucial for accurate part identification.
Commonly needed replacements might include batteries, faceplates, or even complete thermostat units. When purchasing, verify compatibility with your specific 80 Series model to ensure a proper fit and function. Comparing prices across different vendors is recommended to secure the best deal.